Measuring accuracy according to VDI/VDE 3513-2
The measuring error of variable area flowmeters greater in the lower measuring range than in the
upper measuring range due to the design. A statement of the measuring accuracy according to
VDI/VDE 3513-2 provides the user with information comparable to other devices, which nevertheless
takes into account this measuring error dependent on the measured value.
The specifications of the measuring accuracy of variable area flowmeterspresuppose that the devices
are installed and operated exactly as specified. The fluid to be measured must correspond exactly to
the data specified during calibration (density, viscosity, temperature, pressure, etc.).
The measuring accuracy stated by the manufacturer usually refers to the measuring device alone.
An additional error must be taken into account for electrical attachments or other accessories.
In the new version of VDI/VDE 3513-2 (from 2008), an attempt was made to simplify the existing calculation recommendation.
The following error specifications were defined, which should be specified by the manufacturer.
- Error limit value [G]
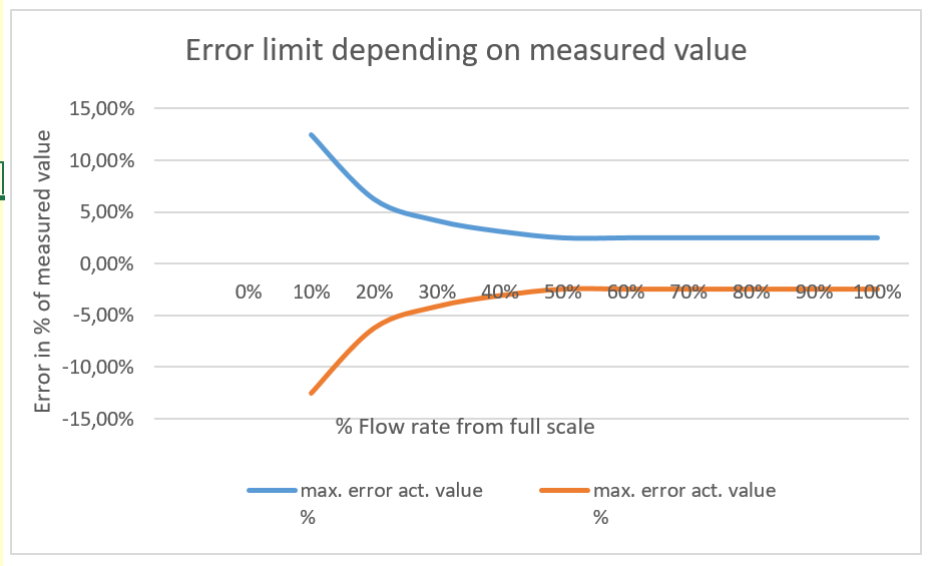
The error limit is the maximum deviation of the measured value above the linearity limit. It is given as a percentage. - Linearity limit [qG]
Above the linearity limit, the maximum deviation of the measured value remains constant. The linearity limit is given as a percentage of the full scale value. The error of the measured value below the linearity limit is greater than the limit value and can be calculated with the formula below.
F% = G * qG / q%
F% = Relative measurement error (i.e. error per measured value in %)
G= Error limit value
qG=Linearity limit in %
q% = Measured value in % of full scale
Example:
Manufacturer's specification: limit value 2.5%, linearity limit 50%.
Measured value: 30% of the final value
The calculated error (F%) at the measured value results in:
F% = 2,5% * 50% / 30%
F% = 4,166 %
In addition to the limit value and linearity limit, the manufacturer often provides diagrams from which the deviation from the measured value can be quickly read.

Old version - Accuracy classes
The accuracy of variable area flowmeters is given in a dimensionless number, the accuracy class.
This is the sum of 2 partial errors and is calculated according to VDI/VDE 3413-2.
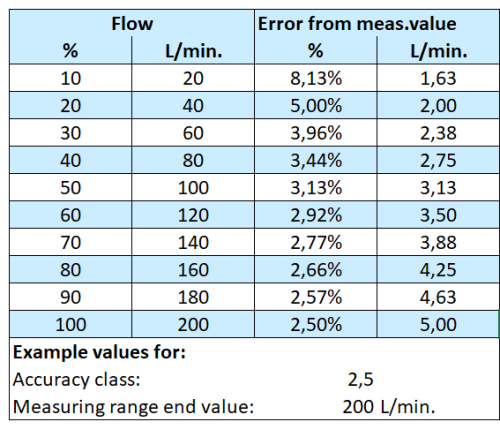
- Partial error 1: ¾ of the accuracy class in % of the measured value.
- Partial error 2: ¼ of the accuracy class in % of the full scale value.
The following formula can be used to convert the deviation in flow units for each measured value.
QErr = (3/4 * QMeas + 1/4 * QMax) * F / 100
QMeas = Full scale value of the flow meter (in flow units)
QMax = Measured value of the flow meter (in flow units)
F = Accuracy class (dimensionless)
(Flow units e.g. L/min,, m3/h usw.)
Example for a device with measuring range end value 200 L/min and accuracy class 2.5

Additional measuring errors
The accuracy values specified by the manufacturer in the data sheets are accuracies which are valid under the
specified standard conditions of the unit, such as pressure, temperature, properties of the fluid, etc.
Particularly in the case of prolonged use of the devices and harsh operating conditions, the practical accuracies
can deviate from these.
What affects the measurement accuracy:
- Medium conditions deviating from the calibration data (e.g. pressure, temperature)
- Material data of the medium deviating from the calibration data (density, viscosity)
- Deposits on the float and thus higher weight of the float
- Deposits on the measuring tube and thus changed annular gap between float and measuring tube
- Wear of the float and the measuring tube due to e.g. chemical attack or abrasion.
- Incorrect installation, e.g. at an angle instead of vertically as prescribed.
- Mechanical damage due to e.g. pressure surges when opening the valve quickly
Calibration of variable area flowmeters
In ISO 9000 ff certified companies, it is stipulated that variable area flowmeters used in industrial
processes must be regularly maintained and calibrated.
The frequency of calibration is determined by the system operator.
Calibration can be carried out by the manufacturer or by an independent certified calibration laboratory,
e.g. company
TrigasFI.
